

Getting started
Sign in, set up your profile, connect your mailbox and check that everything works – your first 20 minutes in Clapilot.
Open in ClapilotClapilot is your team's shared workspace: emails, tasks, appointments, contacts and documents live in one place, and an AI agent works alongside you in every area. This chapter walks you through your first minutes – from your first sign-in to a workspace that is connected to your mailbox.
Good to know: Almost everything you create in Clapilot – contacts, tasks, documents, wiki pages – is visible to your whole team. Only your mailbox, your calendar, your notes, your chats with the agent and the agent's personal memories about you stay private.
Sign in
An administrator on your team creates your account. You receive an email with an invitation link that lets you set your own password. After that, you always sign in on the sign-in page.

- Email – the address your invitation was sent to.
- Password – the password you set using the invitation link.
- Sign in – opens your workspace. You stay signed in until you choose Log out in the menu.
Forgot your password? Ask an administrator to send you a new Reset link under Settings → Admin → Users. See Administration.
Set up your profile
Your name and picture appear in Team Chat, on assigned tasks, in comments and in the signature the agent prepares for you. To change them, open Settings at the bottom of the menu – you land directly in Profile › Account.

- Choose image – uploads a profile picture (PNG, JPG, GIF or WebP, up to 2 MB). In the crop dialog, you move and zoom the frame before you apply it.
- Display name – the name your team and the agent know you by.
- Login email – the address you sign in with.
- App Connections – this is where you connect your mailbox and other services (next section).
Changes are saved automatically. Further down on the same page, you set the interface Language (German, English or Italian), choose the chat animation (Pet) and set a password. The Settings chapter describes every option.
Connect your mailbox
Clapilot can only show your emails, prepare reply drafts and send on your behalf once your mailbox is connected. Open Settings → App Connections and click New integration.
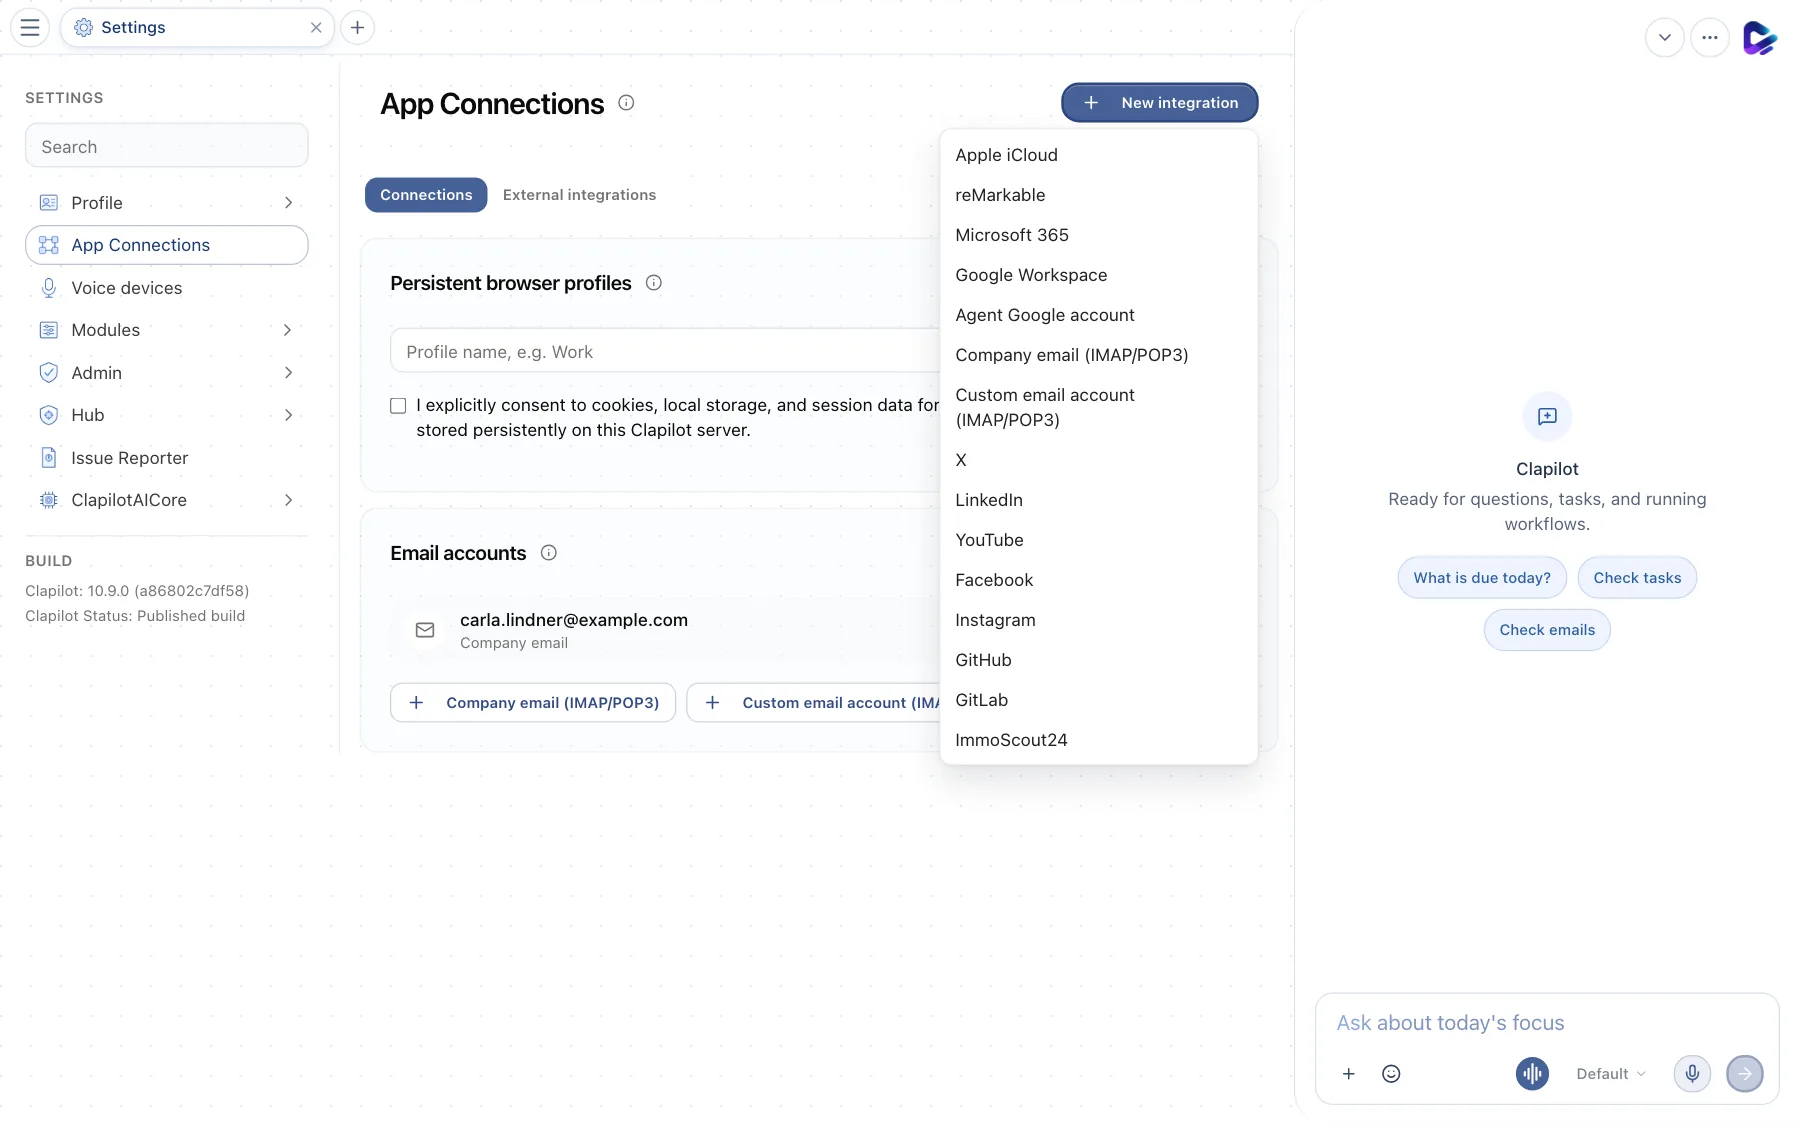
- New integration – opens the list of all services you can connect.
- Available services – for email, choose Microsoft 365, Google Workspace, Apple iCloud, Company email (IMAP/POP3) or Custom email account (IMAP/POP3). The same list includes calendar and storage services such as reMarkable and – depending on the installed modules – social networks.
- Email accounts – shows your connected mailboxes. Use the buttons below it to add more IMAP accounts.
To connect a mailbox:
- Choose your provider. For Microsoft 365 and Google Workspace, the provider's sign-in window opens; sign in there and confirm the permissions.
- For Company email (IMAP/POP3), your administrators have already stored the mail server – you only enter your address and password. For Custom email account, you also enter the IMAP and SMTP servers. Many providers require an app password for this instead of your normal password.
- Then open Emails in the menu. As soon as your messages appear, the connection is ready.
Tip: You connect calendars the same way. Microsoft 365, Google Workspace and Apple iCloud include both calendar and email. You subscribe to individual iCal calendars under Settings → Modules → Calendar.
Your first ten minutes
Once your profile and mailbox are set up, a short tour is worth it. Each item links to the matching chapter:
- Look at the dashboard – your start page with today's tasks, your inbox and suggestions from the agent. → Dashboard
- Ask the agent – type in the chat dock on the right: “What's on my plate today?” → Working with the agent
- File a document – drag a file into Documents; Clapilot reads it and summarizes it. → Documents
- Create a task – in Tasks with the plus button, or in the chat with “Create a task …”. → Tasks
- Say hello to your team – in Team Chat in the #general channel. → Team Chat
How do I know everything works?
- Your name and picture appear in Team Chat.
- Emails shows your messages without a connection warning.
- An uploaded document opens, and the preview shows an AI summary.
- A new task appears on the board and can be moved.
- The agent replies in the chat and tells you which actions it performed.
If any of this doesn't work, see the Help and troubleshooting chapter.